Making 100% Recyled Material Rag Rug Tutorial

It can be a little time consuming, but it’s great busy work for cold winter nights. It’s also a super cheap way to cover wood floors. By making your own rugs, you can tailor the size and shape to exactly what you need.

For the 100% recycled material rag rug, you’ll need: I-size crochet hook, VHS cassette plarn, and tons of scrap fabric cut into 1 inch by 3 inch wide strips

Making the rug base
Step #1. Make a base line of chain stitch crochets the width of the rug you’re making. Make sure that the chain is an even number.
Step #2: Count 4 chain stitches and double crochet into the stitch.
Step #3: Chain stitch once and double crochet the entire base chain.
Step #4: Chain stitch 3, skip one, double crochet into double crochet from previous row.
Step #5: Continue until you have the size of rug base you want.

diy-100%-recycled-ragrug (1)

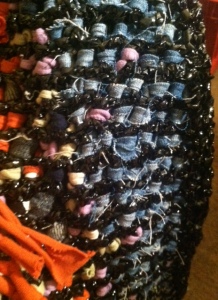
Underside of rag rug

Tying the Rug
Step #1: Start at one corner, tie a fabric scrap onto each border side using a simple knot.
Step #2: Onto each segment, tie another fabric scrap along that border.
Step #3: Work your way up the rug base. Be sure you tie a scrap onto each segment of the edge.
Step #4: Once you’ve covered the rug base, you stop there. Or you can paint the back with no skid-paint.

VHS cassette upcycle cheat #2

I love that my post on upcycling those old VHS cassettes into plarn has been helpful to so many people. Rather than answer each individual person I thought it’d be easier to post a short “how-to” tutorial on the easiest way I’ve found to prep the cassette as plarn.

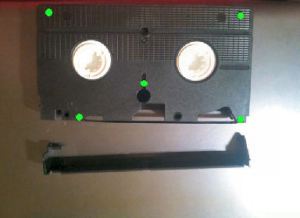
Step #1: Pull off the top cover. There’s a little button that will release the lid. Then just pop it completely off. One side is harder because there’s a metal spring you’ll have to pop out. Then remove the 5 screws (green dots in picture) and put them to the side.

vhs-plarn-1

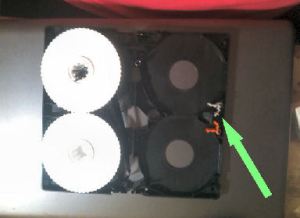
Step #2: Carefully, separate the 2 pieces The back piece has the stop so the film can’t roll freely (green arrow). Remove those pieces. Lift the empty reel and cut the film so you can dispose of it. In the now empty reel area, you can put another full reel from a different movie if you want to. It’ll make doubling up on the film on a project simpler.

vhs-plarn-2Step #3: Feed the end of the film back through the cassette and put the top back on.

vhs-plarn-3Step #4: Replace the screws and you’re ready to “roll”! Just tug on the film when you need more. Using the cassette as a holder will keep the film neatly on the reel and easily portable.

The "stop" the prevents the reels from free rolling. Remove these

The “stop” the prevents the reels from free rolling. Remove these

Upcycle: Uses for VHS cassettes

Nobody uses VHS anymore, right? We all have scads of those bulky cassettes but how many of us actually still have a VCR that works? This idea came to me when I was reorganizing our entertainment center and wanted to get rid of our VHS tapes.

Why not use all those film as ready made plarn? I wasn’t sure how strong it would be, but plarn made from plastic shopping bags is incredibly strong. So, I started crocheting a bag for our bath supplies when we’re camping. I figured it wouldn’t have to be strong to carry that little bit, but it would allow me to figure out what else I could use it for.

That little shower supply bag was incredible. My son weighs about 150 pounds and we picked him off the ground with it! Amazingly sturdy and it’s easier to work with than plarn I’d made from shopping bags. Plus, it looks great. Once you’ve crocheted it, all the bends and turns makes it look like it’s beaded. One cassette even goes forever. I used a single movie (“Babe” the movie with the pig), made 2 shopping bags, and still had film left over.

I’ve found a ton of uses for this stuff! Even have people stealing my bags and begging me to make them some. Purses, shower bags, dirty clothes bag, growing bags, hanging produce, outdoor rugs, etc. You will want to wash the end product well with soapy water though. There’s a residue one some of the tapes.

DIY - Plarn

Close up of crocheting with VHS film recycled into useful bags

Sparkly, strong, and FREE!

How recycled VHS film looks crocheted. Different crochet stitches give a different look.

Project Cost: $0-$0.10 per cassette

Easy Insulation that Works — Bubble Wrap, Rag Rugs, and Fresh Food

Blogging about my new recycled can wood stove heater also reminded me of other cheap & easy DIY ways to winterize that I use. So in no order of preference, here’s a quick list of insulation methods used at my house.

1. Bubble Wrap — Double sided tape and bubble wrap applied to the window. To save even more money, note which window the wrap is on before you take it down. Roll it back up & reuse it the following years.

2. Door and Window socks — Sew all those mate less socks into long tubes, fill them with shredded jeans or scrap fabric, & lay them at the bottom of outer doors. You can also use the round pipe foam insulation as a breeze blocker by sewing 2 pieces together with a fabric sling between them that slides under the door.

3. Plastic draping — We all use clear plastic draping stapled over the window outside. It’s ugly, but works.

4. Indoor Garden Boxes — We have multi-tiered boxes that we built that fit in front of our windows. The dirt and plants actually act as additional insulation AND even help give you fresh fruits and veggies over the cold spell. This even works with the bubble wrap on the windows.

5. Layered Curtains — If you’re not using grow boxes, using multiple layers of curtains works just like wearing layers of clothes.

6. Rag Rugs — Wood floors suck in the wintertime. I get bags of old clothes and fabrics that aren’t in good enough condition for my local thrift store to sell. Slice them into fabric yarn & get braiding, crocheting, and weaving. All it costs is time. With my old dogs, being able to toss the rugs in the washer is a giant bonus.

7. Water Bottles — My shed has windows without glass in them so I use plastic bottles (water, soda, etc) filled with water to close the windows up in the winter. The inside is kept above freezing with the compost bins so the water never freezes completely. The liquid adds an additional barrier & I’ve found it works better than just empty air filled bottles.

8. Adding Humidity — Winter dries the air out so adding moisture back to it will make it seem warmer. I have a metal coffee can with water in it on top of my heater rather than running a humidifier. Every penny counts!