DIY Pumpkin Dog Treats

Recipe: Pumpkin Dog Treats

Tis the season where every new product is pumpkin flavored. Why? Because aside from carving jack o lanterns and tin cans of puree for pie the average person has no idea what to do with pumpkins sadly.

When my son was little, he wanted to grow his own pumpkins for carving so we did. It broke my heart seeing all the waste though so I thought of more ways to use the produce. I’m by no means one of the gazillion pumpkin aholics out there, but it is a tasty treat in the fall.

Another benefit of pumpkins is that if kept in a cool place, fresh pumpkins will keep for ages without other assistance. There’s a reason pumpkins were a popular food prior to refrigerators.

Now my dogs absolutely love their pumpkin treats. Not only is it cheaper than the store bought varieties but it’s healthier too! My old man dog started having problems pooping and the added pumpkin fiber makes it easier on him.

I’m not quite sure on the amounts since I just eye ball it but I’ve roughly estimated. I make my treats softer and more gooey rather than crunchy and about 1/2 inch square. The size and consistency works best for my chihuahuas since they’re older.

DIY Pumpkin Dog Treats

Don’t they look delicious?

Ingredients: 4C flour, 1C pumpkin pureed, 2 eggs, 1/2Tspn salt, & water

  1. In a bowl, mix pumpkin, eggs, and salt until smooth
  2. Slowly add in flour and mix thoroughly
  3. Add water as needed until all the flour has been added and the dough is cook consistency
  4. Allow the dough to sit for 15 minutes and preheat the oven to 350F
  5. On ungreased cookie sheet, lay out 1/2 inch balls so they aren’t touching. The dough doesn’t swell at all so you can really load the sheet up
  6. Bake 10 minutes on one side. Flip the treats over and turn the pan. Bake for another 5 minutes for gooey consistency or 10 minutes for crunchy.

I usually get roughly 140 treats out of the recipe. I store them in a ziplock bag in the freezer to keep them fresh.

Help Conservation & our future

My family and I are fairly active in our community. We’re not the crusading do-gooders by any stretch, but we do like to help in little ways. We found out about a great program that helps generate federal funds for our state’s Fish and Game conservation by reaching out and helping teach people about fishing. The neatest part is that it’s 100% free for us to get certified!

While it’s managed by my state’s Department of Fish & Game, they actually turned the administering of classes over to a great group called Fishing’s Future. Fishing’s Future is an amazing non-profit organization that’s devoted to getting families out on the water fishing and bonding together.

But anyway, more about what we’re doing to get our state’s Fish & Game more funding…

We’re becoming state certified fishing instructors! This will allow us to hold fishing classes that are certified by our state to teach young and old how to fish. Sure, we could do it without the certification, but that wouldn’t get added federal money for conservation. Each class we hold will get the Fish & Game Department a certain amount of money based on number of classes and class size. This will allow our state to battle invasive species, keep populations healthy, and people safe. The best part is that the money can only be used towards fishing conservation.

If you’d like to be more proactive, contact your state’s Fish & Game department. They’re a great resource that people give a bad rap to.

DIY: Homemade Rock Sinkers

Don’t laugh until you read what homemade rock sinkers are all about and my reasoning on why I first tried it. What are sinkers made of? (Lead) Is that healthy to be exposed to? (No) Is it expensive to purchase sinkers? (Yes) See where I’m going with this? Good!

The idea came to me when we were setting lines and ended up tying a rock onto the trot line because the current was so strong nothing else was working. Ancient people used rocks with holes drilled through them as anchors so why wouldn’t it work if I modified it a little? And, yes it does work!

Swivel Sinker Needs: whatever rock size you want to use, swivels, glue

Making your own lead-free swivel sinkers:
1. Be sure the rocks don’t have any sharp edges because it can cut your line.
2. Rough up the part of the rock that you’re going to glue the swivel to. It’ll help your glue hold better.
3. Then just glue it on and allow to dry. Be sure you use a water-proof glue that will work with stone as not all glues will.

Making 100% natural lead-free sinkers:
1. With a 1/8 inch stone bit, drill a hole through the center of the rock.
2. Soften any sharp edges on the rock either by hand or by using a rock tumbler.

I prefer the all stone sinkers because I like my weight to be able to move along the line in a slip sinker rig. My son prefers the swivel sinkers. Both save a ton of money on tackle so are winners!

DIY Mosquito B Gone

This year I’ve developed an allergy to mosquito bites somehow. A single bite blows up to the size of a baseball. Needless to say, as much as I’m outside it’s a big inconvenience! I dislike using DEET for obvious reasons so it’s been research, trial, and error time for a decent safe way to keep the skeeters away. So far, this is what I’ve found that works.

Herb Treatment

I’ve bumped up how much rosemary, mint, and lemongrass I’m growing in the yard. It’s helped significantly reduce the bug population actually. There’s less fleas, ticks, chiggers, and mosquitoes. I keep them trimmed regularly to release the scents (which smell heavenly too) and if I don’t need to trim them I’ll still brush against the plants. The extra herbs also help make my own bug b gone spray.

Bug Repellent Spray

This spray also works great as a flea treatment on your animals and is completely safe. I checked with my vet. You can use a crock pot or just let the tea steep in the sun! Fresh herbs work but I’ve found that dried ones seem to pack more of a punch since I can put a higher concentrate in.

Ingredients: 1C rosemary or lavender, 1C mint, 1C lemongrass (all dried or double if fresh)
Directions: Warm 3C water and mix the herbs into it. In a crockpot, allow to steep 24hours. If using the sun, 3 days at least seem to work. Strain tea and put in a dark container to store. In a spray bottle mix 4parts tea to 1part vodka/rubbing alcohol and 1part apple cider vinegar. Just spray as needed!

Mosquito Trap

Yes it works! And it also will help trap flies too. Everything you’ll need to make it you already have probably.

Supplies: empty plastic 2liter bottle, packet of yeast, sugar, and tape

Directions: Cut the bottle like you did making the Bait Trap, invert the top inside the bottom half & tape into place. In a pan, warm 1C water until it’s hot to the touch. Dissolve 2Tbspn of sugar into the water. Then dissolve the packet of yeast into the water. Pour the water mixture into the bottle making sure to leave only about 1/4 inch between the water and the end of the funnel spout. As the yeast eats the sugar it’ll release CO2 and attract the pests!

Change in Diet

For some people this works better than others honestly. Mosquitos, ticks, fleas, and chiggers hate the taste of onions, garlic, and asafoetida, So since these pests dine on our blood it only makes sense that they’ll avoid those who taste like these things right? Just by bumping up my consumption, I’ve watched other people get eaten up by mosquitoes even when they’re wearing DEET sprays while I’m left alone with no spray at all!

Perfume Stinks Pretty to Pests

I know there’s a lot of people who can’t go without perfumed products whether it’s a spray, wash, deodorant, or laundry soap. This time of year, all the pretty smell is going to do is attract bugs. You’re not going to smell bad if you bath regularly and go with lower perfumed products. Plus, you should be bathing more anyway to wash the dried sweat off your body which is another attractant for skeeters.

Super Mealworm Farm Journey – First Beetle

Today we found our first adult beetle! Plus, it looks like we’ll have 6  more by tomorrow. In a few weeks, we should have our first eggs. I’m so excited to know we’re doing it right. It may seem silly, but each step in their life cycle is an affirmation and we throw a little victory dance.

Yes, it doesn’t take much to excite us and if you’re thinking we’re a family of dorks you’re probably more right than wrong. But…

YAY! A BEETLE!

DIY Bait Trap

DIY Bait Trap from Plastic Bottle

That last post got me in the mood to put together some bait traps for this spring! As you can tell, it took less than 5 minutes to do and my family will have free live bait for the life of the trap. Usually I use a 2 liter bottle, but I had a 1 liter bottle handy. It will work, but I’ll have to check it more often and am more restricted on the size of bait it can catch.

DIY Bait Trap Tutorial

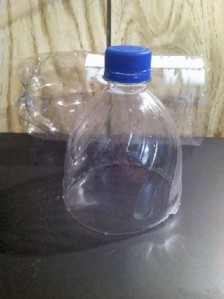
Step #1: Peel & wash the bottle.

DIY Plastic Bottle into Live Bait Trap

Peel the label off the bottle. If there’s a little left where the glue was that’s okay.

Step #2: Cut the bottle where it starts to taper.

Cut the bottle where it starts to taper. Leave the lid on for extra stability.

Cut the bottle where it starts to taper. Leave the lid on for extra stability.

Step #3: Put the live bait trap together so you can poke the lashing holes.

Reusable Live Bait Trap DIY Free

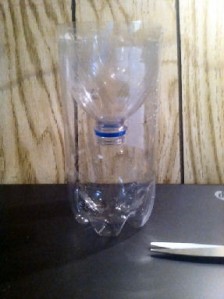
Slide the inverted top into the bottom to check the fitting and drill the holes.

Step #4: Stitch through the holes to hold the bait trap together. You can also use duct tape instead of string, but the string is reusable. The duct tape would have to regularly be replaced.

DIY Bait Trap

Repurposed Soda Bottle turned into a Bait Trap ready to catch live bait

Now your DIY Live Bait Trap is ready to use! Just toss a little food into it to attract bait fish, tie a line on it so you can pull it back up, and sink it. You can regulate the size of bait it catches by shrinking or enlarging the spout hole. This particular trap would only be able to catch crappie sized minnows and crawfish. When you’re ready to empty the trap, just unlace the lashing and dump your bait into your bucket.

If you’re going for crawfish, it needs to be on the bottom.

Minnows and perch can be attracted with a little dog or catfood, bread, crackers, etc. Crawfish seem drawn better to meat products like a piece of hotdog or bologna.

Project Cost: $0 and 5 minutes!
Commercial Bait Trap: $40
Minnow Price Per Dozen: $3.75

Instantly, you’re saving $40!!!

Our Mealworm Farm – 1st Pupae

So while feeding the wormies we were startled to find they had been invaded by what looked like aliens. Am I being overly dramatic? Well it sure felt that way at the time! We knew it was coming, but it was still a shock to see the pupae in the box.

So on our exploration of superworms, we’re now entering our second stage! I guess that means that we’re doing something right since they’re growing big enough to go through metamorphosis. Soon we’ll move onto the third stage – beetles. I can’t say I’m looking forward to that particular stage, but it’ll be interesting.

Ideas for Repurposing Common Household Disposables – Glass Jars

They’re everywhere right? Glass jars that you buy food in. You know they’re strong because they make it through all the shipping so why just toss them into your recycling? Let’s look at different ways we can use that glassware to make our lives easier and more colorful. This goes beyond your daddy storing his screws and nuts.

Pasta Sauce Jars

  • DIY Lanterns – Fill them partially with dry beans, rocks, rice, sand, etc. Slip in a tea light and Viola! Tie twine around the lip and you have hanging luminaries. Glue paper to the outside or transfer your favorite picture for another look that will glow when the candle’s lit.
  • Kitchen Canisters – Spray paint the lids to make them look more appealing. Fill with flour, sugar, coffee, beans, rice, etc. It’ll keep the food fresh without eating into your wallet.
  • Infused Booze – Fill it up with your own homemade infused booze!
  • Grease Catch – A simple way to collect your hot grease and oil for disposal. Reseal the jar and no mess!
  • Memory Jars – Put inside little trinkets from a special occasion & label the top with the date, location, and who was there. Example: Sand, pebbles, kite string, and photo for baby’s first time of flying a kite.
  • DIY Terrarium – Succulents, succulents, succulents! I love them in terrariums and an old pasta sauce jar is a cheap way to make terrariums.

Beer Bottles

  • Oil Lamps – Fill with oil, slip in a wick and you’ll have light for hours.
  • Sand Art – Use a clear bottle and fill with different layers of colored sand. You can get creative and make scenes with a little practice. Fill to the very top and then cork it.
  • Essential oils – If you make your own essential oils, dark bottles are perfect for storing the oil. Just use a cork and you’re all set.

Baby Food Jars

  • Spice Storage – Install magnetic tape to the inside of your cabinet door. Be sure to label the bottom of the jars so you’ll know what you’re grabbing.
  • Sand Art – The different shapes & sizes make a gorgeous tableau.
  • Finger Paint Pots – Pour the paints into the jars. No muss, no fuss. The paints will stay wet and not leak out.
  • Tackle Box Organizer – They’ll keep prepared baits moist and since they’re so small you can easily keep several different baits in your tackle box. They’re also good for keeping sinkers and hooks organized. A piece of magnetic tape on the lid makes it easier to grab a single hook.
  • Lip Balm – If you make your own lip balm, pour it into one of the smaller jars for storage. It’ll last forever!
  • Removing Nail Polish – Cut a hole in the center of a sponge. Stuff the sponge in the jar and saturate with remover. Whenever you need to change your polish, just slip your nail into the hole & rub it around.
  • Candle Jars – These are the perfect size for making your own candles!
  • Gifting Facial Scrub – Mix up your favorite facial scrub or mask and pour it into the jar. Paint the lid or cover with paper/fabric & put a label on it. Now you can spoil your friends with your homemade beauty treatments.

These are just some ideas on what you can do with glass jars that would normally go into the recycling bin. If you have any additional ideas, let me know if the comments!

Making 100% Recyled Material Rag Rug Tutorial

It can be a little time consuming, but it’s great busy work for cold winter nights. It’s also a super cheap way to cover wood floors. By making your own rugs, you can tailor the size and shape to exactly what you need.

For the 100% recycled material rag rug, you’ll need: I-size crochet hook, VHS cassette plarn, and tons of scrap fabric cut into 1 inch by 3 inch wide strips

Making the rug base
Step #1. Make a base line of chain stitch crochets the width of the rug you’re making. Make sure that the chain is an even number.
Step #2: Count 4 chain stitches and double crochet into the stitch.
Step #3: Chain stitch once and double crochet the entire base chain.
Step #4: Chain stitch 3, skip one, double crochet into double crochet from previous row.
Step #5: Continue until you have the size of rug base you want.

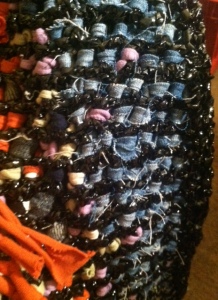
diy-100%-recycled-ragrug (1)

Underside of rag rug

Tying the Rug
Step #1: Start at one corner, tie a fabric scrap onto each border side using a simple knot.
Step #2: Onto each segment, tie another fabric scrap along that border.
Step #3: Work your way up the rug base. Be sure you tie a scrap onto each segment of the edge.
Step #4: Once you’ve covered the rug base, you stop there. Or you can paint the back with no skid-paint.

Starting Mealworm Farm

raising-mealworms

Our mealworms have arrived — I guess I should say our superworms have arrived to be more accurate! Finding a reputable dealer that will ship in the winter months and is near enough to make sure the worms arrive healthy was a chore but finally, success!

We currently have 1,000 superworms munching away happily on some of our homegrown carrots. I’m sure it’s just because they’re new but we’re all finding them fascinating. There’s something almost zen about watching the little buggers crawl around! It’s as relaxing as watching an aquarium, even if its rating on the creepy scale is higher.raising-superworms (1)

When they first arrived, they were sluggish and we thought we were going to lose them. It was 27F for a high and we’d just had a ice and snow storm. We slowly brought them up to temp and miraculously they survived. I think it helped a lot that the seller had thoroughly insulated the box and included a warming pouch.

So, we’re almost ready for crappie spawn! I’ve even thought about giving them a go fishing from the heated dock. I just haven’t gotten myself talked into digging the fishing gear out.

Cost per 2 dozen if bought in baitshop: $7.00
Cost per 2 dozen on current stock including shipping: $0.672
Cost per 2dozen after initial investment: Less than $0.10