Wonderful TV Show for Homesteaders

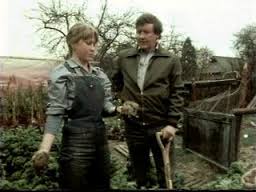
One of my life long friends has been teasing me about being Barbara Good/Felicity Kendal from an old BritCom called “Good Neighbors” or “The Good Life”. I had never seen it but I looked it up on Wikipedia and could vaguely see what she meant. Well, for my birthday she surprised me with the series on DVD! I’m honestly in love with it.

Tom & Barbara Good working in their homestead in the midst of a middle class neighborhood

Tom & Barbara Good working in their homestead in the midst of a middle class neighborhood

The premise is a 40-year-old office worker has a midlife crisis and decides he and his wife are going to turn their yard into a homestead. Even though the series is from the mid-1970s it really showcases homesteading perfectly in my opinion.

Tom and Barbara live in a middle class neighborhood, yes neighborhood. Their yard becomes home to chickens, pigs, and goats to the delight of the audience. The writers take us through the Goods going offgrid with their effluence digester, taking their goats to graze in the town square, looking at common items differently, and bartering modern luxuries for necessities. All while their neighbors and best friends continue living like a typical middle class household.

The Goods and their neighbors the Leadbetters have the stereotypical interaction between homesteaders and 'normal' people

The Goods and their neighbors the Leadbetters have the stereotypical interaction between homesteaders and ‘normal’ people

It truly is a delightful TV series that shows the triumphs and heartbreaks when you choose to live a simpler life.

DIY Pumpkin Dog Treats

Recipe: Pumpkin Dog Treats

Tis the season where every new product is pumpkin flavored. Why? Because aside from carving jack o lanterns and tin cans of puree for pie the average person has no idea what to do with pumpkins sadly.

When my son was little, he wanted to grow his own pumpkins for carving so we did. It broke my heart seeing all the waste though so I thought of more ways to use the produce. I’m by no means one of the gazillion pumpkin aholics out there, but it is a tasty treat in the fall.

Another benefit of pumpkins is that if kept in a cool place, fresh pumpkins will keep for ages without other assistance. There’s a reason pumpkins were a popular food prior to refrigerators.

Now my dogs absolutely love their pumpkin treats. Not only is it cheaper than the store bought varieties but it’s healthier too! My old man dog started having problems pooping and the added pumpkin fiber makes it easier on him.

I’m not quite sure on the amounts since I just eye ball it but I’ve roughly estimated. I make my treats softer and more gooey rather than crunchy and about 1/2 inch square. The size and consistency works best for my chihuahuas since they’re older.

DIY Pumpkin Dog Treats

Don’t they look delicious?

Ingredients: 4C flour, 1C pumpkin pureed, 2 eggs, 1/2Tspn salt, & water

  1. In a bowl, mix pumpkin, eggs, and salt until smooth
  2. Slowly add in flour and mix thoroughly
  3. Add water as needed until all the flour has been added and the dough is cook consistency
  4. Allow the dough to sit for 15 minutes and preheat the oven to 350F
  5. On ungreased cookie sheet, lay out 1/2 inch balls so they aren’t touching. The dough doesn’t swell at all so you can really load the sheet up
  6. Bake 10 minutes on one side. Flip the treats over and turn the pan. Bake for another 5 minutes for gooey consistency or 10 minutes for crunchy.

I usually get roughly 140 treats out of the recipe. I store them in a ziplock bag in the freezer to keep them fresh.

DIY Mosquito B Gone

This year I’ve developed an allergy to mosquito bites somehow. A single bite blows up to the size of a baseball. Needless to say, as much as I’m outside it’s a big inconvenience! I dislike using DEET for obvious reasons so it’s been research, trial, and error time for a decent safe way to keep the skeeters away. So far, this is what I’ve found that works.

Herb Treatment

I’ve bumped up how much rosemary, mint, and lemongrass I’m growing in the yard. It’s helped significantly reduce the bug population actually. There’s less fleas, ticks, chiggers, and mosquitoes. I keep them trimmed regularly to release the scents (which smell heavenly too) and if I don’t need to trim them I’ll still brush against the plants. The extra herbs also help make my own bug b gone spray.

Bug Repellent Spray

This spray also works great as a flea treatment on your animals and is completely safe. I checked with my vet. You can use a crock pot or just let the tea steep in the sun! Fresh herbs work but I’ve found that dried ones seem to pack more of a punch since I can put a higher concentrate in.

Ingredients: 1C rosemary or lavender, 1C mint, 1C lemongrass (all dried or double if fresh)
Directions: Warm 3C water and mix the herbs into it. In a crockpot, allow to steep 24hours. If using the sun, 3 days at least seem to work. Strain tea and put in a dark container to store. In a spray bottle mix 4parts tea to 1part vodka/rubbing alcohol and 1part apple cider vinegar. Just spray as needed!

Mosquito Trap

Yes it works! And it also will help trap flies too. Everything you’ll need to make it you already have probably.

Supplies: empty plastic 2liter bottle, packet of yeast, sugar, and tape

Directions: Cut the bottle like you did making the Bait Trap, invert the top inside the bottom half & tape into place. In a pan, warm 1C water until it’s hot to the touch. Dissolve 2Tbspn of sugar into the water. Then dissolve the packet of yeast into the water. Pour the water mixture into the bottle making sure to leave only about 1/4 inch between the water and the end of the funnel spout. As the yeast eats the sugar it’ll release CO2 and attract the pests!

Change in Diet

For some people this works better than others honestly. Mosquitos, ticks, fleas, and chiggers hate the taste of onions, garlic, and asafoetida, So since these pests dine on our blood it only makes sense that they’ll avoid those who taste like these things right? Just by bumping up my consumption, I’ve watched other people get eaten up by mosquitoes even when they’re wearing DEET sprays while I’m left alone with no spray at all!

Perfume Stinks Pretty to Pests

I know there’s a lot of people who can’t go without perfumed products whether it’s a spray, wash, deodorant, or laundry soap. This time of year, all the pretty smell is going to do is attract bugs. You’re not going to smell bad if you bath regularly and go with lower perfumed products. Plus, you should be bathing more anyway to wash the dried sweat off your body which is another attractant for skeeters.

Ideas for Repurposing Common Household Disposables – Plastic Bottles

Disposable plastic bottles seem to rank right up there with those cheap plastic grocery bags as the bane of landfills. Whether its an 8oz water bottle or a 2 liter soda, you can upcycle them into useful items around the house. You’re just limited by your imagination with what you can do with them.

Sprout Container – cut off the top so you’re left with a cup. Fill with water and it works well to sprout your own beansprouts, avocados, houseplants, etc. The narrow diameter makes it easier to control how much of the plant is in the water.

Funnel – The cut off top with the mouth is an excellent funnel whether you’re adding oil to your vehicle or transferring dirt.

Fly Trap – Pour an inch of vinegar into the bottom. Then roll a paper funnel to slide into the bottle. Make sure the bottom of the funnel is 1/2 inch from the top of the vinegar so the flies can get in but not get back out. Works great for pesty fruit flies and wasps too!

Bird Feeder – Cut 2 small holes on opposite sides of the bottle (where birds will get feed from). Then slide a wooden dowel or stick through a hole beneath each feed hole for a perch. Fill with seed and then hang outside. It’s easy to refill and you don’t have to deal with very much clumping from rain. You can even paid the bottles to make them more appealing.

Dried Herb & Dry goods storage – Be sure to the inside of the bottle is completely dry. Fill up with dried herb or whatever dry goods you’re storing. Viola! No way bugs can get in and will keep the food fresh longer.

DIY Beads – Slide the bottles into strips & roll them up. Use a heat gun to melt the plastic together and you have your own unique beads for jewelry. You can even use Sharpie markers on the strips before you roll them up for more details.

“Church Purse” – cut the bottle so the bottom makes a baby’s cradle. Punch holes around the cradle’s top to anchor the yarn through. Then crochet a “purse” that you close with a slip string. When you open the purse, it should open wide enough to look like a flowing blanket around a crib. Put a babydoll in the cradle and your daughter has her own special big girl’s purse.

My Hanging Herb Garden – I love this year’s new design!

Wall Art Garden – Lay the bottle on its side & cut out the side. Fill with dirt and your favorite herbs. Then you can hang from the ceiling down the wall like a chandelier.

Jug Fishing – This works with any bottle, bleach, laundry, soda, etc. Be sure the lid is tight and tie on a line with live bait. Toss in the water and pick it up a few hours later. You don’t want to do this is open water like a river since you can lose it. each area has its own laws regarding jugging so check with your local DWFG.

Bait Trap – 2 liter bottles work best for a bait trap. Submerge with a little food toss in and let it sit for a couple hours. When you pull it back up, you’ll have bait fish teeming inside!

Insulation – We use layered plastic bottles in our garden shed’s window to help insulate. Works great as a barrier.

Soap Storage – If you make your own liquid dish and laundry soap, plastic bottles can be a free way to store the surplus until you need it.

There’s literally infinite ways to upcycle plastic bottles but I’m going to stop here or I’ll be typing forever. Now I’ve got the urge to make some bait traps so check back for a step-by-step tutorial on how to DIY.

Companion Plants – Get to thinking

I stumbled across this article about companion plants that when grown together increase each others yields. I was always taught that plants that go well together on the plate grow well together in the garden. Tomatoes and basil. Corn, squash, and beans. Etc. It’s nice to see that old rule of thumb being passed on. The article also gives some great suggestions on companion plants that will naturally and safely reduce garden pests. It’s just a good read and will hopefully get you thinking about how to garden more naturally and gain higher yields for the effort.

Top 10 Companion Plants

Ideas to Reuse Silica Gel Packs

Don’t throw them out! Those little white packs are extremely handy if you just know how to reuse them. They’ll keep things fresh, remove moisture, and keep your important items safe. Did you know you can even rejuvenate the silica gel so you can keep using it even when it’s past it’s peak absorption level?

Rejuvenate silica gel, you put loose silica gel in a 275F oven for about 90minutes. You’ll know the gel is dried when it turns a middle blue color. You can also rejuvenate the gel in the microwave. Just cook it on medium heat in 3 minute increments and stir. When it changes to a middle blue color, it’s dry!

So now that you know you can keep on reusing those nifty little packets. What can you actually use them for?

  • Stop Rusty Hooks – Toss one in your hook box and be amazed. It’ll slurp up the moisture that dulls and rusts your hooks before it causes any damage. They also work great in your toolbox!
  • Cut the pack & dump several into a mason jar. Now you can safely dry flowers for keepsakes and dry out that cellphone that fell into the sink. Put the item in the jar, reseal the lid, and let the silica work its magic.
  • Photo and important paper storage – Keep a silica pack in with them and never worry that the humidity is makign them damp or moldy.
  • Ammo Safety – Slip one in your ammo storage box. It’ll cut down on misfires even if your ammo is a few years old.
  • Seed Library/Storage – Be sure to drop a silica pack into each seed storage box to keep your seeds safe for spring planting.
  • Foggy indoor windows – Lay a pack on the window sill so it’ll absorb the humidity rather than your windows getting covered in condensation. Be sure the pack is out of reach of any children and pets though.
  • Stinky Shoes – Each night, drop a silica pack into your shoe. It’ll dry the insides faster which reduces odor.
  • Specimen Collection – If you collect insects, drop the dead bug into a baggie of loose silica. It’ll speed up the drying process and not damage the specimen.
  • Drying Soap – If you make your own soap but drying it drives you nuts, silica packs will significantly reduce the drying time.
  • Dry good preservation – Keep drop a pack in your onion/garlic powder to stop clumping. It also works great with brown sugar.
  • Root vegetable storage – If you grow your own vegetables, you know storing over the winter can cause you to deal with sprouting and rot. Sprinkle silica packs in the storage area to absorb the moisture causing those issues.

DIY: Compostable Seed Starter Pots

You can purchase compostable pots made from peat, paper, chewed up fabric, among other things. I like saving money though and making my own is easy and free. Not only that, it gives me a chance to have some great messy quality time with the family! We use a few different types of plantable pots though.

#1 Toilet Paper & Paper towel rolls
We cut them into 2-3 inch sections and line a tray with them. Toilet paper rolls give us 2 pots and paper towels usually about 5. Then fill with soil and plant a seed in each tube. Don’t lift the tubes out until you’re ready to transplant though. The soil will come out the open bottom if there’s not a significant root system established.

#2 Egg Cartons
I’m talking about the cardboard (not the foam) egg cartons. Each carton gives you 12 little pots. Just fill with soil and seed. When you’re ready to transplant, cut them apart and plant each one.

#3 Newspaper
There’s a couple different ways we’ve done in the past. The first one,we cut the newspaper into 6 inch sections and used 2 ply sections to make tubes. We laid a light bulb on the newspaper with a few inches sticking out the bottom that we folded up. Then rolled the newspaper into a tube around the light bulb. We tied it off using jute twine. This gave us a bottom so the soil didn’t fall out as badly. Be sure when you line the tray with them that they’re packed in fairly tightly because the newspaper gets weak when wet!

The other method we used for newspaper pots was papier-mache. In a blender we mixed the water, flour and torn up newspaper until it was pulped and the consistency of loose clay. Then we free formed pinch pots with it. It took awhile for them to dry but they seemed to hold firmer than just plain newspaper. Plus, they also broke down faster once planted in the garden.

Christmas: Time to think about starting seeds

Christmas is a couple weeks away and it’s the perfect reminder to get your head back into your garden. That’s right! Now is the time to start thinking about what delectable niblets your garden will grow this upcoming season. So first off, here’s an overview of my garden’s to do list for the end of the year.

I need to figure out what I want to grow and how much I want. I map out each garden on a piece of paper and allocate what goes where. Then I’ll know how much of each plant and when I need to get the seeds started. Always better to be prepared when possible, I also use these little maps when it’s time to actually put the seedlings in the ground. A measuring tape, string, hammer, and a few posts are all I need to make sure I have enough room for what I wanted to do.

After I figure out how much and what exactly I am planting, I’ll have to go through my private and communal seed libraries to collect the needed seeds. This also gives me enough time to order any varieties I have to without putting me behind schedule. It’s so frustrating when you find out you’re out of a seed and the company is on back order.

This is also when I start making my seedling pots in my spare time. It’s a great project for little ones to help with too!

Non-stinging super-pollinating bees

I saw a special on TV about bees that were super pollinators, immune to colony collapse, and didn’t sting. I found it intriguing and had to know more since my husband is highly allergic to bee stings. I’ve been researching my little heart out to see if all the claims were true about solitary bees and how to use them in my gardens. Talk about confusing, but the claims seem for the most part to be true.

Super-pollinators? Yes! While honey bees gather a lot of pollen from each plant, solitary bees gather less from each plant. This means a solitary bee visits more plants than a honey bee and spreads more pollen!

Immune to colony collapse? I found a lot of information about solitary bees and colony collapse but I couldn’t find a definite answer. There’s only one species of honey bee in the U.S. and it does without a doubt suffer colony collapse. To me, it just makes sense to find out about an alternative even if the alternative may suffer the same thing.

Bees that can’t sting? Actually some solitary bees can sting which almost broke my heart. That’s the main reason I was researching them. I did discover that though solitary bees can sting, they typically don’t sting so hooray! In the documentary I saw on TV, the man had probably 6 bees in his hand shaking them up and they didn’t sting him.

Harder to raise than honey bees? I found this completely wrong actually. While honey bees require a lot of equipment and set up, solitary beekeeping can be started for less than $20! That includes buying stock that is native to your area.

So after my research, I think we’re going to try our hand at raising solitary bees this season. While we won’t get honey, we will hopefully do our part to keep the pollination process rolling along.

Composting in a Bag?

Bag of swamp crawlers ready for release

Bag of swamp crawlers ready for release

I want to start off by saying I have no idea what official variety this worm is. Down South they’re just called swamp crawlers. They don’t need refrigeration. They thrive in pretty much any environment. They breed like crazy. They can get up to 9 inches long and as big around as your pinky finger which is incredible for fish bait. Plus, they process compost faster than the typical red wigglers. Be warned though, if you have a fear of snakes these are not the worms for you. They’re very active and are well known for ‘jumping’ at you when disturbed.

I don’t remember why exactly, but we didn’t release them into our indoor grow beds when we set up this year. I thought it would be interesting to show how easy it is to vermicompost. Even in a cloth bag, they worked their magic and gave us black beautiful compost! Keep in mind, this is in no way a good method but our forgetfulness gave the perfect opportunity to showcase just what swamp crawlers can do and how easy it is to compost.

diy-compost-fishing-wormsIt also shows exactly how fast this worm breed grows. When we put them in the bag, they were a mixture of sizes ranging from 3 inches down to hairs with the majority being a couple inches long. After a little over 6 weeks, they have grown, bred, and eaten into fat and sassy fish bait sized worms. Yes, there’s still hair-sized babies since they’re breeding, but average size seems to be about 6 inches long and the diameter of a No. 2 pencil.

Remember, this was all done in a cloth bag in about 6 weeks. We kept them moist and added food scraps when needed. Other than that, we ignored them completely.